Materials / Supplies needed for a battery or AC power operated colloidal silver generator:
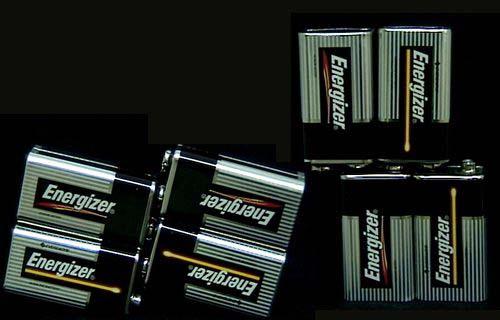
Four nine volt alkaline batteries are needed to achieve the desired 30 volts of electricity. Although four batteries in series total 36 volts, the drain on the batteries brings the total voltage down.
You may also consider finding a plug-in, DC (direct current) power supply for convenience; it should be near 30 Volts with a constant current between 100 to 200 milliamps. If your DC transformer has a higher voltage than you can obtain, you can still level it off with the potentiometer. A constant current wall transformer that functions around these specs and all the other necessary lab ware can be found at American Science and Surplus.
You may consider attaching a 25 to 50 kilo-ohm potentiometer in series with your power source in order to adjust the voltage for a more controlled reaction. Attach on the cathode "negative" side of battery bank or DC power source.
You should also attach a multimeter across the silver electrodes in order to monitor the stability of the current and voltage. Some multimeters also have built in ammeters which is especially useful in monitoring for these sensitive types of reactions.
Two nine-volt battery-to-clamp adapters and a set of metal clamp test leads. Two nine volt battery clips and three each of red and black test leads w/ alligator clips for easy identification should suffice. You might consider the option of getting rechargeable batteries if you choose to use them as a your power source.
One glass beaker that comfortably holds about eight ounces of fluid. The 250 ml pyrex lab beaker shown is OK.
Two fine silver rods ( 9 cm rods shown, 14 gauge ) or two strips of 18 gauge fine silver wire. Any silver used must be at least 99.9 percent pure. DO NOT Sterling Silver. Pure silver wire is available from jewelers and gemstone dealers, so remember to ask for it by purity. 99.9% or higher is for internal therapy and on mucous membranes. You should also try eBay for Pure Silver Wire).
One gallon of distilled water; it's best to make your own since recycled plastic bottles can affect the purity of distilled water. If you have no choice but grocery store distilled water, try to get the water with the latest expiration date.
A white roll of paper towels.
A pure nylon scrub pad.
600 grit sandpaper.
Amber or cobalt blue glass bottles to store the colloidal silver solution.
Laser diode pen or similar + diffraction crystal / prism (optional).
How to Prepare the 9 Volt Battery Colloidal Silver Generator Setup
Attach the clamps to the battery leads: Attach one metal clamp to the red ( positive ) wire of the nine volt battery-to-clamp adapter, and one clamp to the black ( negative ) wire of the second lead adapter. Simply strip enough of the wire casing off of the wires to ensure that there is enough bare wire exposed to securely attach the lead to the clamp.
Attach the battery pairs: Take two nine-volt batteries and snap the positive pole of one to the negative pole of the other. Nine volt batteries are made very easy to snap together this way. Repeat the process for the second set of batteries.
Attach the two battery sets together: When the four batteries are attached a circuit has actually been completed. Take the two battery sets and snap them together.
Completing the hookup: The final step is to attach the battery leads. Attach the positive ( red ) clamp/lead to the exposed positive pole on the batteries. Attach the negative ( black )clamp/lead to the exposed negative pole of the batteries. To test the connection, tap the two clamps together to see if a small spark is generated. You should be generating about 36 volts at µ 30 to 40 milliamp-hours {mAh} depending on the grade of batteries). With potentiometer in series, you should continuously level off the current to the beginning value as the reaction proceeds; this helps keep the particle size going into solution relatively uniform.
As the solution becomes more ionic the voltage will decrease as the current between the electrodes will increase. As the reaction proceeds the solution becomes more ionic and the production of colloidal silver agglomerates too much after a certain saturation point; it is easy to precipitate solid silver when this happens, therefore, you must constantly observe the reaction and steadily level off the current until the reaction reaches this saturation point. Using the aforementioned multimeter in parallel with the circuit will help you monitor this reaction.
How to prepare materials for making colloidal silver:
Make sure your hands are impeccably clean, cleaner than Julia Child's "impeccably" clean hands, so remove any jewelry from your hands! A contaminant in the electrolysis solution can foul the reaction and cause wasteful precipitation among other contaminants.
Use the nylon scrub pad and dry scrub the inside of the glass beaker used in the generator.
Rinse the beaker thoroughly. Use a clean paper towel to dry the beaker. Rinse with a small amount of distilled water.
Always scrub the silver wire or rods with a nylon scrub pad before use. To save silver, use light pressure and agitate quickly. Depending on the grade of the silver you might want to sand the wires with a light abrasive such as 600 grit sand paper. Don't use any metallic abrasive or rougher than 600 grit or you will waste precious silver. This should only be done once to help initiate the electrolysis. If you happen to be using 99.99% pure silver wire, this step is not necessary.
Wipe off the rods with a clean paper towel soaked with a small amount of distilled water.
Assemble the colloidal silver generator as previously described.
Add approximately eight ounces of distilled water to the glass beaker.
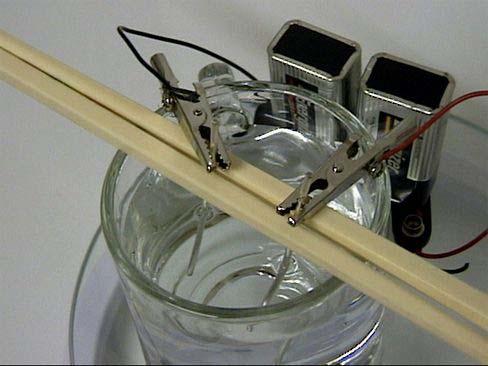
Preparation is complete. Clamp the silver rods to the battery setup. Any clean, non-reactive substance may be used to help position the rods above the beaker. See the following picture for an example.
Notations During the Colloidal Silver Production Process:
Nylon is used for two reasons: 1) It is a non-reactive substance and any accidental contamination will not interfere with the reaction. 2) It
is a nontoxic substance. As a substitute, here are two plain bamboo chopsticks bound with rubber bands or clamps which allows you to remove the electrodes when it's time.
Position the battery setup so that both attached rods may be easily inserted in the water. For optimum performance, the spacing between rods should be between 1.5 and 2.0 inches apart. The silver electrodes should be positioned as close to the center of the beaker as possible to prevent increased conductivity generated along the rim of the beaker. Ideally, try to make the electrodes equidistant to each other and the rim of the container.
Position the electrodes parallel to each other. This encourages uniform conductivity between them. The positive and negative silver rods should never touch each other.
Once the rods are positioned correctly, note the time. As the batch progresses through the first 10 to 15 minutes, very little change should be apparent. As the fifteen minute mark approaches, pay particular attention to the reaction.
Anywhere between 15 and 30 minutes, you might notice a thin yellow cloud or a yellow "wisp" drifting between the electrodes; This is an indicator of constant voltage with increased current between the electrodes. The yellow color indicates a clustering or agglomeration of silver colloid particles which may or may not be desirable depending on the pathogen. If you are using 99.99% Pure Silver Wire, agglomeration is less likely. This indicates that the number of silver ions between both rods is reaching a point of agglomerate saturation. It would be extremely helpful at this point to use a laser diode with a wide beam, so you can scan the solution for the Tyndall Effect - tiny sparkles floating in solution reflecting the laser light.
Video: Tyndall Effect within a one gallon jar using a green laser
The wisps between the electrodes will be quite orderly as if observing a slowly evolving electric field. These wisps spread throughout the solution in 15 to 30 minutes.
Mark the time. You should also mark the distance between the silver electrodes, the voltage and milliamp-hours applied, so you can compare numbers for the most successful batches.
Allow the reaction to continue for five minutes. Disconnect the negative power source from your silver cathode. Then, very carefully, remove the "negative" cathode from the water (one slow, gliding motion - no bumping or tapping allowed!). Wait about two minutes for the positive electrode to gather excess negative ions; this allows the solution to stabilize, so there will be no precipitation later. After two minutes, gently remove the positive rod from the colloidal silver.
Notice the remaining yellow wisps slowly dissipating. As time progresses, the colloidal silver will retain its "water" clear color. No visible particles should be present. If you are using 99.99% pure silver and have followed all instructions for stabilizing the solution, there should be no precipitate at the bottom. If you end up with precipitate, then use an impeccably clean eye dropper or syringe to siphon out the particles. You can mix these particles in an external skin medication as long as the particles are small enough.
Video: Wall Transformer Setup for Colloidal Silver Production
The above video has my CS generator setup with with a meter monitoring the voltage. I can also monitor current with same. The wall transformer setup is markedly different from the 9V battery setup because:
You have a CONSTANT source of power
The current will actually increase with the reaction
Since the current will increase with ion saturation in the solution you must observe the reaction carefully or you WILL precipitate your silver out of solution.
When you have a constant source of power you have to carefully observe the reaction for the saturation point. This is the point when you want to slowly back off the voltage/current. There are two clear indicators to see at saturation depending on temperature, humidity, purity of distilled water, electrical line conditions, etceteras:
When there is a sudden drop in voltage (0.5 to 1.0 volts) and a sudden increase in current (10 to 50 milliamps depending on the current of your wall transformer
When you see the voltage dropping/current increasing relatively quickly as opposed to when the reaction started.
For example, you don't see it, but I have 110V transformer that outputs 48 volts DC at 100 milliamps. Make sure to use a DC transformer, NOT AC. In the above picture you see that I have leveled the voltage to 30.5 volts. For example, if that voltage suddenly dropped to anywhere between 30.0 and 29.5 volts, then the solution has reached an ion saturation level. This is when you want to slowly back off the voltage with your potentiometer over the next five minutes.
In this setup I am using a 100K ohm pot in series with a 25 ohm rheostat; this allows me to decrease the voltage/current to nearly zero without interrupting the circuit.
At the end of five minutes, disconnect your negative electrode from the power before slowly removing it from solution. This is to prevent accidentally touching them with power on.
Remember to leave your anode in the solution with power on for two more minutes before removing.
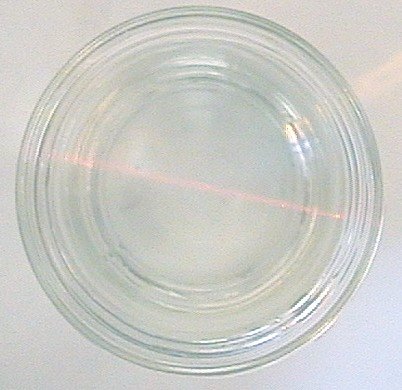
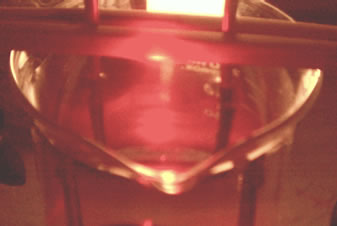
In the shot to the left, I tried to use a laser and a cheap camera to capture the Tyndall effect. The video above using the green laser has far better resolution. In the video, you can see the wisps of reflecting particles aligned between the two electrodes. They are obviously too fine for a low resolution camera.
When using a laser, scan for an orderly gossamer mist forming between the electrodes like so many lines of force or "nebulous clouds." If you have a high resolution camera, then you can capture them a lot better.
With this method, every single batch will have a variable PPM (parts per million) reading. If the above instructions are followed, the end product silver concentration will be 3 to 5 PPM. The size of the silver colloid particles average between 0.001 and 0.04 microns in diameter. This wide range of sizes increases the efficacy of the CS to kill a larger variety of pathogens.
Colloids between 0.001 and 0.005 microns in size can be achieved with a premium constant current CS generator. These sizes are sufficient to kill smaller microbial pathogens before they mutate into long protein strands of viral DNA.
Check the quality of the distilled water by scanning with a wide-beam laser diode before a batch, AND to scan the CS solution after it has "matured" a few hours. If the silver particles are large enough for you to see throughout the solution, then you know you have applied too much current to this batch. In this case, use it for external use only.
You can also use a pure water tester (PWT) to measure any conductivity of your distilled water and the parts per million (PPM) in your CS solution.
Colloidal Silver Production in a one gallon jar
I have been producing colloidal silver in a one gallon, cobalt blue jar for a years now with no ill effects. As you see, I configured the silver electrodes in circles like those old UHF antennas. This configuration exposes the most surface area in a smaller space while making it easier to keep the electrodes parallel to each other and evenly spaced from the jar's mouth.
Final Notes on Colloidal Silver Production
When both silver electrodes are placed in the distilled water, an electrolysis reaction begins. Electrolysis is the decomposition of an electrolyte by the action of passing an electrical current through it. In our case, the electrolyte is formed in the distilled water by silver ions which form colloids in solution as we see in the formula. id est:
2Ag + H2O » Ag+2 + 2e- + AgO + H2 (anode)
Ag+2 + 2e- » Ag (cathode)

In solution, the positive silver ions
form colloids by sharing electrons with
other silver ions:

Ag+2 + Ag+2 » 2Ag+2

Legends:
Ag ~ silver
H2O ~ water
e- ~ electron
AgO ~ silver oxide
H2 ~ hydrogen gas
Notice, at first, that no visible reaction is apparent. This is due to the fact that distilled water, a VERY low semiconductor of current, allows very little travel of electrons between both silver rods. It is the travel of electrons that sinters off the silver into the distilled water. The greater the conductivity between the electrodes, the faster the reaction.
From the moment an actual circuit is completed ( by placing both rods in the water ), electrons DO, however, begin to travel from the negative pole (cathode) to the positive pole (anode) passing through the distilled water. Through the process, the metallic silver atoms gain an electron, and thus ionic silver ( Ag+ ) is created. As the process continues increased conductivity also caused charged particles to form in the water ( Ag- ).
Since distilled water heavily restricts this travel, the amount of current traveling through the solution is very low. This is ideal. It keeps the reaction at a bare minimum, which in turn produces the greatest amount of silver colloids (a better quality colloidal solution) mixed with an 75 to 85% ionic silver solution (as opposed to silver precipitating to the bottom of your beaker). The greater the current traveling through the water, the faster the reaction takes place; this produces more colloids, but, in turn, precipitates solid silver metal and agglomerates colloids into useless clusters that are unable to kill viral pathogens.
Any increase in the speed of the reaction results in the production of LARGER particles of silver colloids. Keeping the current well below 40 milliamps ( ideally a constant between 5 to 20 ma) helps to prevent agglomeration, although you might prefer some agglomerations according to the pathogens you need to kill. The more complex the colloidal solution, the more germs and bacteria it is able to render inert. A constant current CS generator can achieve this.
As the minutes pass, one will notice a slight discoloration on both rods. This is a good indication that the reaction is proceeding as desired. On the negative terminal, neutral silver or a black plating of silver oxide ( AgO ~ silver with no electrical charge ) begins to plate the silver cathode. As the reaction continues you will notice small bubbles forming and rising off of the silver anode. This is hydrogen (H2), a simple and harmless gas. If you note the equation above, the valence of silver increases to +2 with the increase of ions in solution. On the positive terminal, as the reaction continues, one will begin to notice the buildup of "sludge", as it is often called. This is actually silver oxide ( AgO, dark tan color ). While this silver oxide is relatively harmless, it is undesirable to have silver oxide or silver flakes in the end product ( i.e. for internal use colloidal silver ). To avoid this, pay close attention to the purity principle above. Avoid overrunning or "over burning" the batch. Leave the "positive" electrode in the solution for a few minutes after the removal of the "negative" terminal to allow the sludge to oxidize a bit. By doing this, when the sludge covered rod is gently removed, the sludge will stay adhered to the rod and not drop off into the solution; it is easy at this point since you may now remove the entire apparatus from solution.
By the discoloration of the rods, it is evident that a reaction is indeed occurring. Colloidal silver is actually being produced from the first moment, although the concentration is not great enough to been seen by the naked eye. As time passes, the reaction begins to speed up. The silver ions, being dissolved, increase the conductivity of the water. In turn, more current travels between the two poles. This, of course, increases the amount of silver ions being siphoned ( or sintered ) from the silver rod.
There is a very definite point in this process where the speed of the reaction causes LARGE non-ionic particles of silver ( sometimes referred to as "sparklies" ) to be precipitated into the end solution; this is the Tyndall effect. Remember, these are the particles you can see with the naked eye when scanning with your wide-beam laser diode. That is why both purity and timing are important elements in producing a quality colloidal silver solution, especially with the basic generator.
At this point, it is interesting to note the reason behind the idea of using a 30 volt power source. Experienced practitioners in this colloidal silver generation method have discovered that the the silver electrodes burn cleanest using 30 volts of electricity. There are numerous ways to refine the colloidal silver generation process; this can be done with a proper constant current CS generator. The indicator to watch out for is the first sign of golden "wisps" in the solution; this indicates an agglomeration of colloids. This also indicates that there is an EQUAL dispersion of electro-colloidal silver particles, usually sized between 0.001 and 0.01 microns, in the area in which this yellow color is visible.
Silver particles adsorb indigo light between this size range and, therefore, reflect yellow. Another sign is especially when the applied current suddenly leaps upward during the reaction. Extensive testing conducted through electron microscope photography ( through trial and error batch testing ) has shown that once the first sign of yellow wisps appear, a 3-5 ppm solution is created if the reaction is then stopped five minutes from the initial observation. This is dependent on using about eight ounces of room temperature distilled water, and careful observation of the purity principle and all of the suggestions mentioned.
If you have a constant current set up, then your solution will remain clear, so you will have to measure PPM using a meter and/or using a laser pointer to study the Tyndall effect. The longer the batch runs after this "rule of thumb" point, the greater the risk of producing large particle of silver.
Since the "professional" colloidal silver generators utilize a DC (direct current) power source you should also experiment. An electronic surplus has DC transformers of every shape and size. You just have to find one close to 30 volts with relatively low amperage (100 milliamps or less). From there, you can attach a potentiometer and rheostat in series with the negative lead to control the reaction. A rheostat potentiometer is more sensitive in controlling voltage and current in these applications although they are a little more expensive. When you find a DC transformer around 30 volts you only need a potentiometer around 25 to 50 kohms to level off the voltage during the reaction and a rheostat to maintain the current.
Once the electrodes have been removed, cover the top of the container, and allow the batch to sit for a few hours, preferably in a dark storage area. Test the batch, if possible, with a laser light pen in the dark. A light "Tyndall" effect will be observed. Search the solution for bright shining "sparklies" floating in the water. With practice, one can easily produce a sparklie free colloidal silver batch.
If large, bright particles ARE observed, avoid filtering (such as a coffee or other fine particulate filter) if at all possible because different size colloid particles affect different organisms;it's actually good to shoot for complexity rather than uniformity in our colloidal silver solutions in dealing with different pathogens.
Use a needless syringe or other similar process to transfer the desired portion of the colloidal silver solution from one container to another. If proper care is taken, the new container will not contain precipitate. One may use any leftover colloidal silver in the original container for topical applications with no risk (see the colloidal silver applications page - For example, Silvadene is the preferred topical solution for preventing infection by most medical doctors and emergency clinics).
Notes on "cleaning" your colloidal silver solution
Careful study of an average ( as apposed to superior ) batch with a laser pen reveals the following:
Very tiny flakes of silver floating on top of the solution. Siphon off the top portion.
Larger particles that settle toward the bottom third of the solution. Use the bottom portion of each batch for non-internal uses.
Possible small particles of silver free floating in the water ( "sparklies" ).
Upon these observations, slowly extract the desirable solution using a syringe without needle. Scan the batch again. If you use 99.99% pure silver wire with a stable voltage and current in the optimum configuration, and you have been very careful in handling the electrodes, then this step will probably not be necessary.
Countless people have used far less stringent guidelines drinking the colloidal silver on a daily basis for years with no adverse effects. These guidelines are provided to give the interested novice a strong knowledge base to start from. It is a wise practice to store colloidal silver in a UV protected dielectric container such as cobalt blue glass. However, most practitioners agree that a high quality solution will be fine in any glass bottle. Glass amber bottles are also good for storage and can be acquired from health and holistic food stores.
Periodically, check a stored batch of colloidal silver for precipitate on the sides and the bottom of the beaker. In fact, it is interesting to store a "good" batch in see through glass, and observe any changes occurring over time. This will give one a strong indication on the quality of the colloidal silver being produced. After settling "overnight" the completed batch should either maintain it's clear color, or have a slightly yellow tone if overly agglomerated. However, the colloidal silver can be used immediately after production.
The Color of Silver
Always an angelic color; used for communication with EI's/Angels.
The Tesla Transmitters are designed to replicate the ideas expressed in Wilhelm Reich's "Cosmic Superimposition" of formative fields. When two living energy fields mutually interact, they can stimulate each others' excitation to the point of illumination - in other words, CREATE LIGHT!


Comments